Manually Prepare Drive for Windows Vista BitLocker
Ever since knowing BitLocker can be used without a TPM chip (instead, with a startup USB key), I wanted to give it a try on my old Pentium M notebook, Sony TR1.
You can bookmark or share this article using the following:


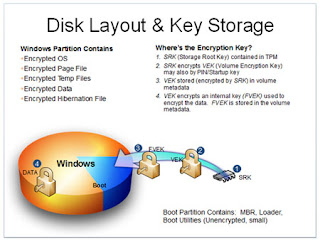
Since BitLocker requires a second partiton (of 1.5GB) that is unencrypted in order to store the encryption keys and stuff, users who didn't configure their hard drive during installation of Vista will have to do it another way.
Vista Ultimate offers a tool called BitLocker Drive Preparation Tool (as a Windows Update Extra). All it does is automate the process of setting up a second partiton:
- Shrinking C: (or unpartitoned space if there is any, and at least 1.5GB)
- Assign it letter 'S:'
- Set it 'active'
- Change a {bootmgr} entry in the BCD and move the 'BOOTMGR' file and 'BOOT' folder to that partition
For users of Vista Business, they have to complete the above procedures manually.
It involves 3 tools. "Disk Management" (graphical interface), "BCDEdit.exe", and "BootSect.exe" (command line interface)
Part 1: Defrag and Disk Management
- Before we begin, make sure the disk is fully dedragmented (e.g. by using: defrag /c /w /f)
- Run "Disk Management" tool by typing "diskmgmt.msc" at "Start Search".
- Right click C: (the Vista system partition) and select "Shrink". Free at least 1.5GB space.
- Create a primary partition from the unpartitioned space and format it as NTFS and assign it letter S:
- Right click and select "Mark this partition as 'active'.
Part 2: BCDEdit.exe
- Before using the tool, copy BOOTMGR (file) and BOOT (folder) from the root of C: to that of S:. It will warn that some files in the BOOT folder can't be copied. They will be copied with the bcdedit.exe tool in step 4. Confirm at least BOOTMGR is copied now.
- Run "cmd.exe" as administrator by typing "cmd" at "Start Search" and pressing Ctrl+Shift+Enter to open it.
- Assume Vista is on C:, enter
bcdedit /set {bootmgr} device partition=S: - To copy the BCD that couldn't be copied in step 1, enter
bcdedit /export "S:\BOOT\BCD"
Part 3: BootSect.exe
- At the command prompt, enter: bootsect /nt60 s:
- Done.
Seems this method is still unofficial after all. Some error message showed when I tried entering "bcdedit". However, after entering the following, it is back to normal:
- bcdedit /import "S:\BOOT\BCD"
Note
- Please don't try it without data backup. Not guaranteed to work but it works here.
- It changes the active primary partition.
- Bitlocker will reboot to check whether the system is capable of accessing USB devices at boot time before it encrypts the partition.
Afterthoughts
Turns out my notebook (Sony TR1) is too old afterall. It doesn't detect USB at boot (BitLocker without TPM requires a USB startup key), so it failed. (Researching third-party solutions to see if there is an easier way such as requiring just a startup PIN to get it to work.)
You can bookmark or share this article using the following:
Comments
Post a Comment